
Smart Retail Overview
Smart Retail is a standalone Point of Sale (POS) system developed by SketchTeck Systems to help retailers manage their shops easily and efficiently.
The Point of Sale (POS) or Point of Purchase (POP) is the time and place where a retail transaction is completed. At the point of sale, the merchant calculates the amount owed by the customer, indicates that amount, prepares an invoice for the customer and gives the options for the customer to make payment.
Smart Retail automates all the activities performed at the point of sale, takes care of profit tracking and down to the generation of reports that will trigger wiser business decision making
Why Choose Smart Retail
- Smart Retail works without internet. Most POS systems require internet to work which puts the user through the hassle of buying internet data which is an extra cost associated with the retail business. SketchTeck Systems eliminated that extra cost by building a standalone system that runs locally without the need for internet connection.
To cater for loss of data, SketchTeck Systems incorporated an automatic backup feature which backs up the database at an interval set by the user. Backed up data can be saved on the cloud of an external storage media for safe keeping .
Backed Up data can be restored at any point in time
- Smart Retail has a clean and simple user interface that allows the user to navigate the system easily
- No thorough training is required to use the system
- It has a beautiful graphical user interface (GUI)
Features of Smart Retail
✓ Addition and removal of users
✓ Add, edit and delete products
✓ Add stock
✓ Input and reading of product barcode
✓ Generation and printing of barcode
✓ Adding and deleting of product brands and categories
✓ Set store name
✓ Quick search products using filters
✓ Record of inventory and transaction details
✓ Generation and printing of receipts and reports
✓ Database backup and restore
✓ Tracking of highly purchased products
✓ Low stock alert
✓ Tracking of profits
✓ Allow user settings for major modules
Installation
Software Requirements
- Computer with the Windows Operating System
- Minimum of 10 GB HDD space
- 4 GB RAM or better
Hardware Requirements (Needed for Complete and Fast System Usage)
System can be used without them. They are not compulsory
- Receipt printer
- Barcode reader
Installation Guide
Follow the installation steps and sequence carefully
Step 1 - Download and install MySQL server. Download it from here.


Note: The above steps must be followed in the exact order to ensure a successful installation of the application
Step 1 - Download and install MySQL server. Download it from here.
- Run the setup to get the screen below.

- Click the + sign left to MYSQL Servers
- Click the + sign left to MYSQL Server
- Click the + sign left to MYSQL Server 5.7
- Click MYSQL Server 5.7.11 - X86 to get it highlighted in blue as shown in the image above
- Click the right arrow to move the highlighted item to Products/Features to be installed panel
- Click next and click Execute at the next stage
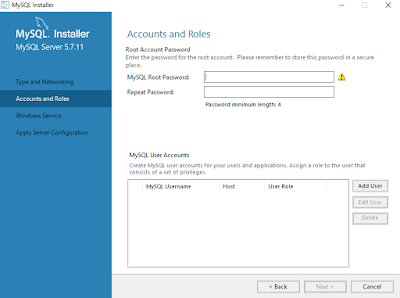
- Click next until you get to the Accounts and Roles page as shown below.

- Enter richatit as MYSQL root password and repeat it for the repeat password box
- Click Next until you get to Apply Server Configuration stage as shown in the image below

- Click Execute. When a popup message says "configuration is taking longer than expected", click OK to continue waiting
- Click Finish when everything is done.
Step 2 - Download and install ODBC driver from here . Installation is straightforward but if you run into errors, It means you don't have Visual C++ installed on your computer. Download and install Visual C++ from here . Try Installing ODBC driver again and this should install without problems
Step 3 - Download and install reporting framework from here . This allows the generation and printing of reports and receipts. Installation is straightforward.
Step 4 - Download and install Report Viewer from here .
Step 5 - Finally, download and install Smart Retail. Click here to download
Step 5 - Finally, download and install Smart Retail. Click here to download
Note: The above steps must be followed in the exact order to ensure a successful installation of the application
Getting Started
Connection Screen
On launching the application, the first screen that shows up is the connection screen. This screen allows you to run a stand-alone version of the system or connect to a remote database. The image below shows the connections screen.

The Standalone Application
You must have the database server installed on your computer to use this. This means that, the application will be used on that computer only and there will be one checkout point.
To run standalone, just click Run Standalone to continue to the application.
Client and Server Mode
The Server
If there is more than one checkout points in your shop (more than one computers to use Smart Shop), The database server has to be installed on one of the computers for the others to connect to it. The computer with the installed database server will have to connect to the database with it's IP address. From the connection screen above, Click the pencil icon beside the IP Adapter box to enable changing of the adapter. You can then click the Up or Down arrow to change the value. If a particular adapter has the IP address of the computer, the IP address automatically loads to the IP address box. Now you have to copy the IP address and paste it in the Server IP box. If the IP connects to the database, the error indicator beside the Server IP box should change to a checked mark. Then you can click Save and Continue.
See image below

See image below

The Client
The client enters the IP address used by the server into the IP server box. If the IP connects to the database, the error indicator beside the Server IP box should change to a checked mark. Click Save and Continue to proceed.
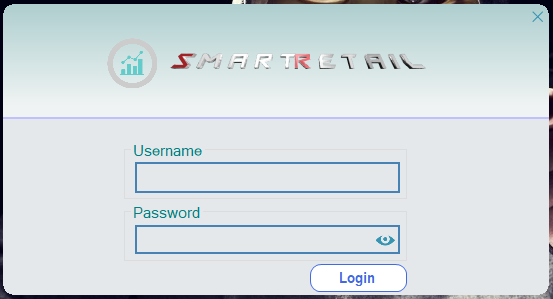
Login Screen
The login screen shows up after the connection screen. You must have an account before you can have access to use the system. By default, the application comes with one admin account which will be used by the admin to login and add other users. It is required for the admin to create and use another admin account and delete the default or modify the details of the default and keep using it.
The image below shows the login screen.
Admin System Use
When an admin logs into the system, the application asks how he/she wants to use the system. This allows the application to enable access to the necessary features.

Using the system as an admin allows the admin user to perform all admin tasks (from generating reports down to setting up application) including selling functionalities. Thus, using the system as admin enables the user to have access to all modules at once. When the admin user use the system as a seller, he/she only has access to sell products.
Note: This screen only shows up when an admin logs in
First Look
After a successful login comes the main application interface.

All menu items are clearly stated and labelled. If there is a button without text, hovering over the button will display the label.
The application menu is at the left where we have dashboard down to setup. Clicking any of the menus will display its corresponding contents at the right which is the main working area.
From the image above, the dashboard menu item is selected showing some sales statistics.
How-To Guide
How-To Guide